Last Updated on August 21, 2025 by Satyendra
SharePoint is a web-based collaboration platform from Microsoft and it offers powerful tools for controlling access to resources. However, as organizations grow, the managing of this access to files and content becomes increasingly necessary.
In this comprehensive guide, I will walk you through everything you need to know about SharePoint permission levels, from understanding the default permission levels to creating custom permission levels and managing access at the folder and item levels.
Users and groups must be granted some level of permission to have access to SharePoint sites. This can be done in either of the following ways:
- Add the user directly to the SharePoint site/list/list item with the specific permission level
- Add the user or security group to a SharePoint group. This group will already be assigned a particular permission level.
SharePoint Default Permission Levels
Default permission levels are a set of permissions that a particular user or group is allocated in order to perform specific actions. SharePoint provides the following default permission levels: Full Control, Design, Edit, Contribute, Read, View Only and Limited Access, and these levels can be modified to suit the needs of your organization. However, it is important to fully understand what each level means before changes are made to them.
- Full control – Users with full control can perform any action on the site, including creating and deleting lists and libraries, adding/deleting members, creating alerts, and changing their access. This gives complete control over a site and is typically reserved for site owners.
Gives users full control over the website and they are granted all the permission rights. - Design permissions – Design permissions allow the user to do everything that the Contribute permissions do. In addition, they can create new document libraries, columns, and views and change the website’s layout by adding or moving web parts.
- SharePoint edit permissions – This permission level allows users to manage lists and document libraries, and to edit pages in a site. This level is assigned to site members by default.
- SharePoint contribute permissions – Allows the user to view, add, update, and delete content, but not create new lists and libraries or manage permissions. This is appropriate for most users who need to collaborate on a project or contribute content to a site.
- Read permissions – Users can open and view SharePoint content, including documents, pictures, and lists. They’ll not be able to create, modify, or delete. This is the default permission level assigned to site visitors.
- View only permissions – Users can view items, web pages, lists, and so on but they download documents. This level is applicable for users who only need to view content, such as stakeholders or clients.
- Limited access – Users get fine-grained permissions in limited access and can access shared and limited resources, a specific asset, document library, or a folder. Users cannot access, edit or delete the entire website.
| Permission Level | Permissions Included by Default |
|---|---|
| View Only |
|
| Limited Access |
|
| Read |
|
| Contribute |
|
| Edit |
|
| Full Control |
|
Creating Custom Permission Levels in SharePoint
The default permission levels in SharePoint may not be enough to meet the needs of your organization. To address this, SharePoint allows you to create custom permission levels that can be tailored to your specific requirements.
To create a custom permission level, navigate to the site where you want to create it, and follow the steps below:
- Click on the gear icon in the top-right corner of the page and select Site Permissions
- Under the Site Permissions panel, click on Advanced Permission Settings
- Click on Permission levelsin the ribbon at the top of the page
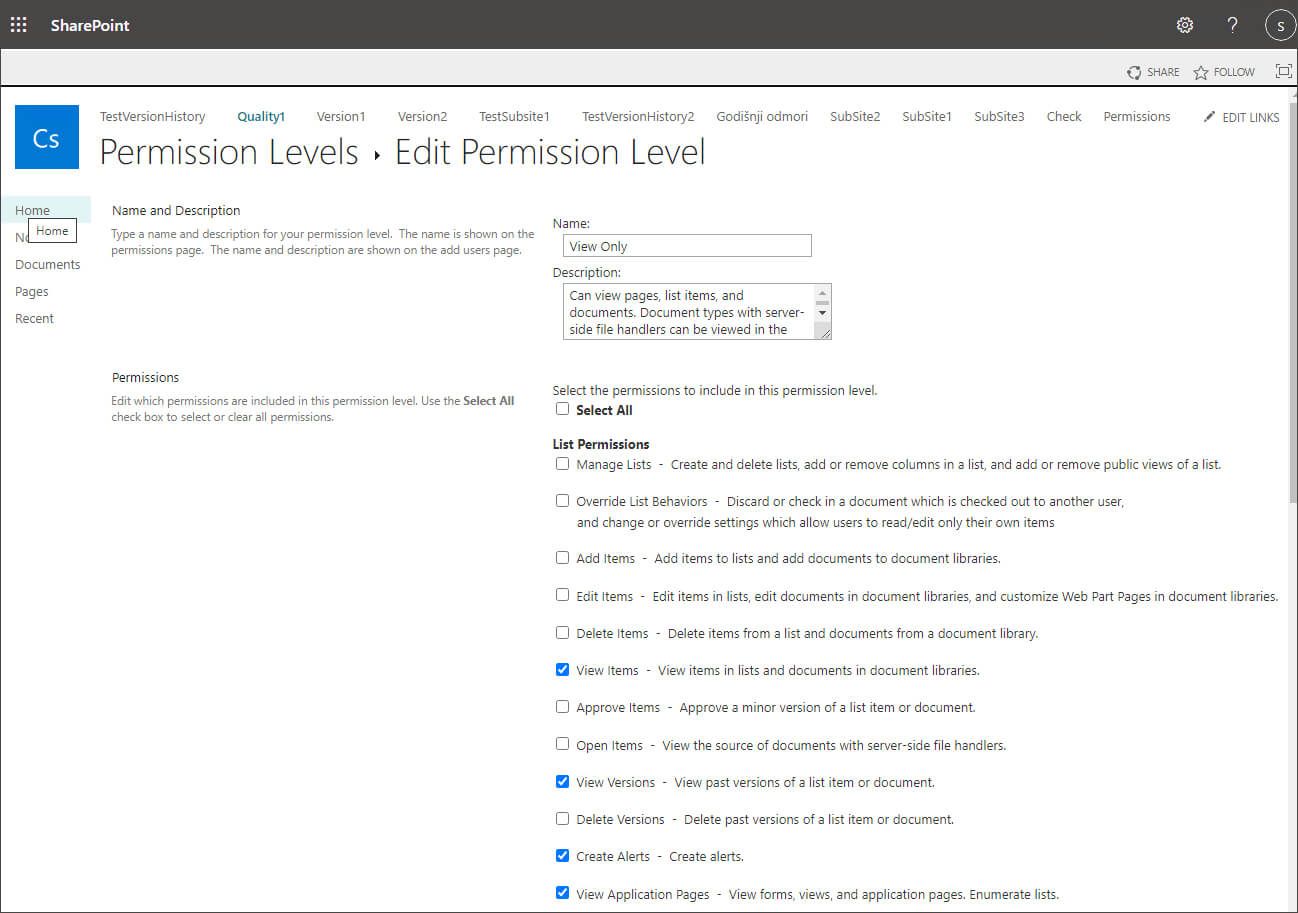
- Pick any existing permission level and click on its name. For example, Contribute. Scroll down to the bottom and click on Copy Permission Level
- Give your new permission level a name and optional description. For example Contribute with no delete
- Select the permissions you want to grant to users at this level. You can select or deselect any available base permissions. For example, Open items, Edit Items, Client integration features, Personal views, View application pages and so on
- Click Create to finish creating the custom permissions
Once you’ve created your custom permission level, you can assign it to individual users or groups, in the same way that you would for any other permission level.
Editing and Managing Permission Levels in SharePoint
As a member of the Site owners’ group, you can determine the level of access to your site. You can grant users access to the whole site, or to specific information on the site, such as a list or even a single file. Assigning permission levels to a specific item can help you to protect sensitive content, such as budget information, without restricting access to the rest of the site.
SharePoint groups and permission levels help you to efficiently manage access to sites. You add users to SharePoint groups and assign permission levels to your site and to its contents. By default, permissions on lists, libraries, folders within lists and libraries, items, and documents are inherited from their parent site. However, you can assign unique permissions to items at a lower level, such as subsites, libraries, or even files.
To edit permission level at the site, follow these steps:
- Navigate to the site collection where you want to edit the permission level
- Click on the gear icon in the top-right corner of the page and select Site Settings, Site Permissions
- Click on Permission levels in the ribbon at the top of the page
- Find the permission level you want to edit and click on its name
- Make the desired changes to the permissions
- Click Save
Defining Folder Level Permissions in SharePoint
As well as for sites and lists, you can also define folder-level permissions to further restrict access to specific folders within a site collection. To set folder permissions, follow these steps:
- Navigate to the site or site collection where you want to configure folder level permissions
- Find the folder you want to restrict access to, right-click on the folder and choose Manage Access.
- Click on the … icon and choose Advanced Settings
- Click on Stop Inheriting Permissions
- Remove any users or groups that you don’t want to have access to the folder
- Add any users or groups that you do want to have access to the folder
- Click OK
Once you’ve defined folder level permissions, users can only access the folder if they have been explicitly granted permission to do so.
How to Change Permission Levels of Users and Groups
As the needs of your organization change, you may find that you need to modify the permission levels of individual users or groups. To change a user or group’s permission level, follow the steps below:
- Navigate to the site or site collection where you want to change the permission level.
- Click on the settings gear icon in the top-right corner of the page and select Site Settings, Site Permissions (under Users and Permissions)
- Under the Permissions panel, click on Advanced Permissions Settings
- Find and select the user or group whose permission level you want to change
- Click on Edit User Permissions
- Select the new permission level you want to assign (or remove any existing permission levels assigned) to the user or group
- Click OK to save your changes
Once you’ve changed a user or group’s permission level, they will have access to the resources associated with their new permission level. Similar to site-level permissions, You can customize permissions at the document library settings, too.
Set Item Level Permissions in SharePoint
In addition to folder level permissions, SharePoint also allows you to set permissions on individual items within a list or library. This can be helpful if you want to restrict access to specific files or items within a project. To set item level permissions:
- Navigate to the list or library where you want to set item level permissions
- Find the item you want to restrict access to and right-click on the item and choose Manage Access.
- Click on ellipsis (…) on the page and click on Advanced Permisions
- Click on Stop Inheriting Permissions
- Remove any users or groups that you don’t want to have access to the item
- Add any users or groups that you do want to have access to the item
- Click OK to commit your changes.
Once you’ve set item level permissions, users will only be able to access the item if they have been explicitly granted permission to do so.
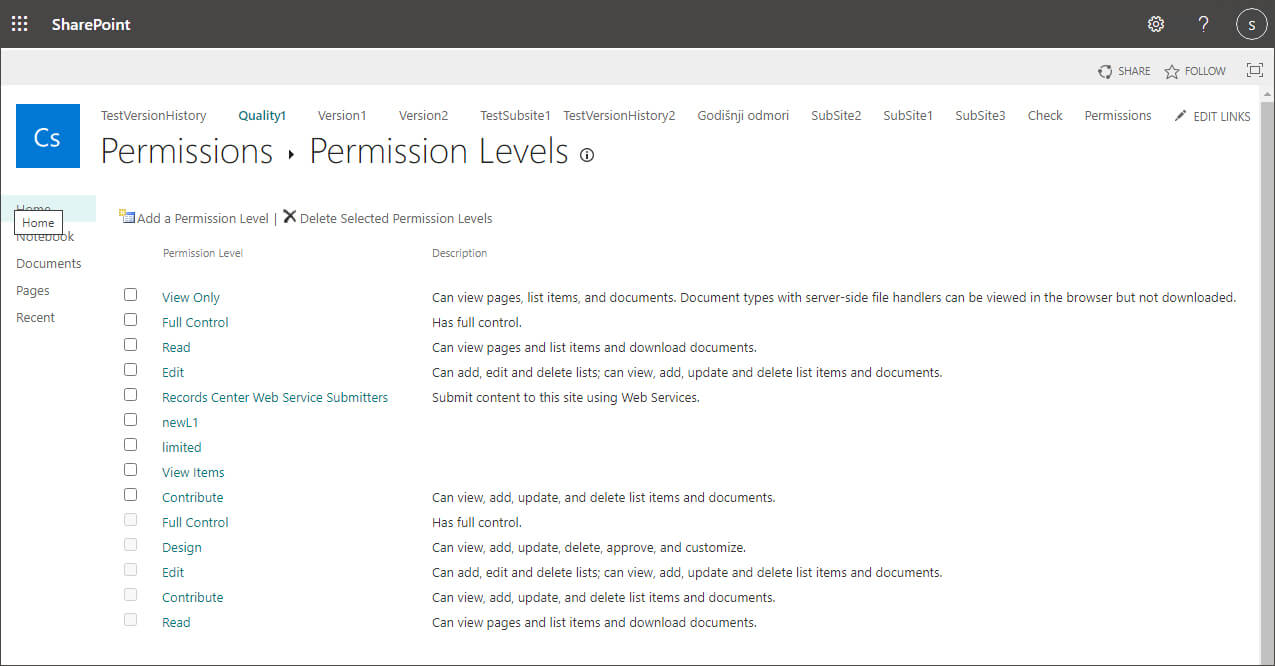
Get all Permission Levels in SharePoint
To get all permission levels available on your SharePoint site collection, follow these steps:
- Log on to your SharePoint site collection as a site owner
- From select Site Settings, Site Permissions (under Users and Permissions)
- In the ribbon, click on Permission Levels. You will see all the different permission levels for the site collection
Best Practices for Assigning Permissions
The following are some best practices to be aware of when assigning permissions:
- Regularly review and update permissions to ensure that users have the access they need and nothing more
- Use folder and item level permissions to further restrict access to resources
- Use custom permission levels to tailor access to your organization’s needs
- Train users on how to use SharePoint’s permission system correctly to avoid common mistakes
- Use SharePoint’s built-in tools for managing users and groups to make permission management easier
How Lepide Can Help
A straightforward way to have visibility over all your SharePoint Permissions is to run the Permissions by SharePoint Object report from the Lepide Data Security Platform.
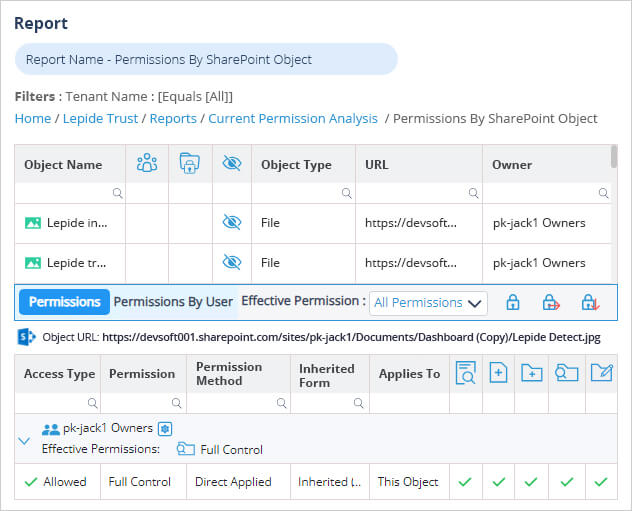
To run this report:
- Select Lepide Trust, Reports
- From here, expand Current Permission Analysis
- Select the Permissions by SharePoint Object
- Select Generate Report
- Expand the required folder to see related permissions
The report is generated and can be filtered, sorted and exported to CSV and PDF format.