

Data breaches are a serious threat to any organization and so action needs to be taken to keep the risk of these threats to a minimum. The focus at Lepide is to provide visibility over what’s happening with your data and through visibility you can take the necessary steps to mitigate risk and stay compliant.
With vast amounts of data being generated daily in all organizations, it is crucial that issues such as data access attempts and unwanted modifications made to shared files and folders are identified quickly. The Lepide File Server Auditor enables you to get a complete overview of all events taking place in your file server environment with detailed reports and real-time alerts. Our automated Solution constantly monitors and tracks file activity to spot anything which may be malicious and could lead to serious security breaches.
Lepide Auditor for File Server enables you to audit critical file server changes and interactions. The Solution will track when files and folders are created, accessed, modified, copied or deleted in file server. Along with monitoring file activity, permission changes can also be tracked and compared across file servers.
Our File server auditing software addresses common sysadmin challenges, including investigating deleted files, failed access attempts, and generating detailed audit reports. Lepide overcomes the limitations of PowerShell and event logs to provide full Windows File Server auditing capabilities.
What Are the Limitations of Native File Server Auditing Methods?
The auditing capabilities provided by Microsoft event logs seem comprehensive but there are limitations to using them and some activities cannot be determined using only event logs. Some examples of these are given below:
- Was a file created or modified? The only way to know the difference between a new file and a modified file is to know whether the file existed before.
- Missing information on failures. For the purposes of cybersecurity, it can be essential to know when someone failed to access a file. Windows file auditing only writes a single Event ID 4656 for a failed access attempt which has occurred because of permissions.
- Cut & paste. It may be assumed that a cut and paste action would be the same as a move operation. However, in practice, the behavior is recorded as a delete followed by a create operation with no relationship whatsoever between the two actions.
A more straightforward approach to native file server auditing is to use the Lepide Auditor for File Server. Our File Server Auditing software provides hundreds of pre-defined reports to audit your system. In this article we list the top ten file server audit reports included within the Lepide Auditor and explain the advantages of each.
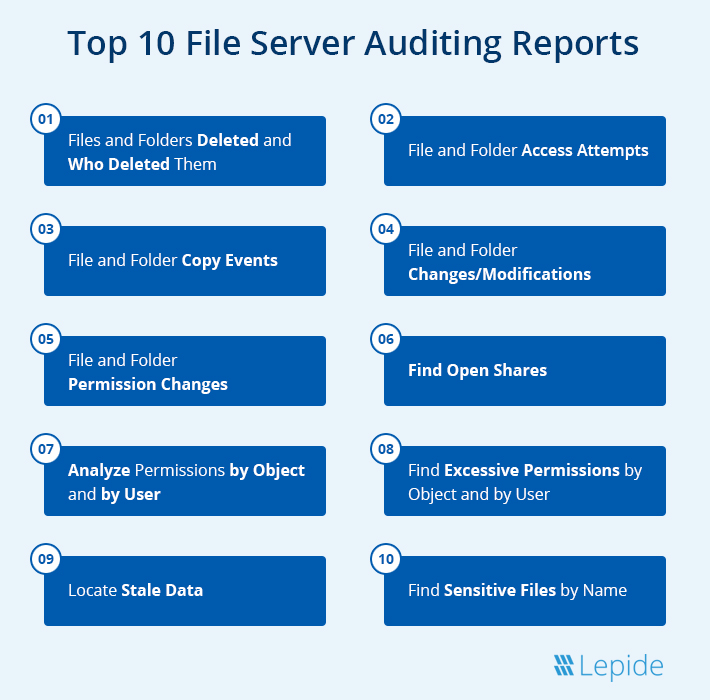
What are the Top 10 File Server Auditing Reports?
Below is the list of the most important file server audit reports that every system administrator should regularly review to ensure date security and meet compliance mandates.
- Files and Folders Deleted and Who Deleted Them
- File and Folder Access Attempts
- File and Folder Copy Events
- File and Folder Changes/Modifications
- File and Folder Permission Changes
- Open Shares
- Permissions by Object and by User
- Excessive Permissions by Object and by User
- Stale Data
- Sensitive Files by Name

1. Files and Folders Deleted and Who Deleted Them
Files which contain sensitive data should not be deleted without the knowledge of system administrators. Therefore, it is essential to have visibility over any files and folders which are deleted by regularly monitoring all file and folder activity.
Native Method
One way to track activity is to run a PowerShell script on a regular basis to see all files which have been deleted since the script was last run. However, this can be time consuming and complex and relies on somebody having PowerShell scripting knowledge and remembering to run the script.
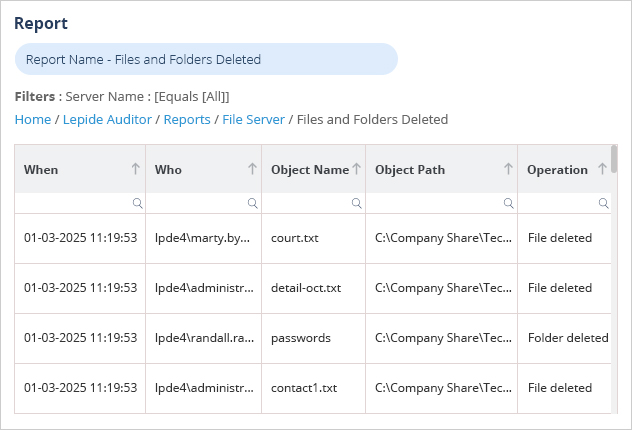
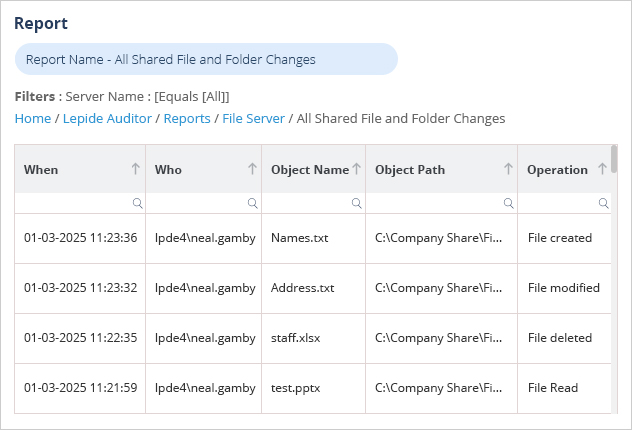
The Lepide Files and Folders Deleted Report
Lepide Auditor includes predefined reports which can easily generate a list of new files together with additional information such as who created the files. This is a more straightforward approach as it means you do not have to check and decipher the system event logs and along with the Lepide reports, you can create alerts to notify you every time a new file is created giving you immediate information on file creation activity.
The following is an example of the Lepide Files and Folders Deleted Report:

2. File and Folder Access Attempts
In any enterprise that uses file servers to store and share data, auditing is essential to ensure data security. Proper monitoring of all file servers in a domain can help to identify any unwanted or potentially damaging events, including file accesses and read events on files containing sensitive data.
It is possible to track who accesses files on Windows File Server in an organization using Windows Event Logs. However, a simpler process can be achieved using the Lepide Auditor and both processes are explained below.
Using Native Methods
Steps to Audit File Access on Windows File Server using Event Logs:
- Configure the Audit Object Access audit policy
- Enable auditing on the files that you want to track
- Search the relevant Event IDs in Windows Event Viewer to track who read the file. Event ID 4656 and 4663 are logged if a file is opened.
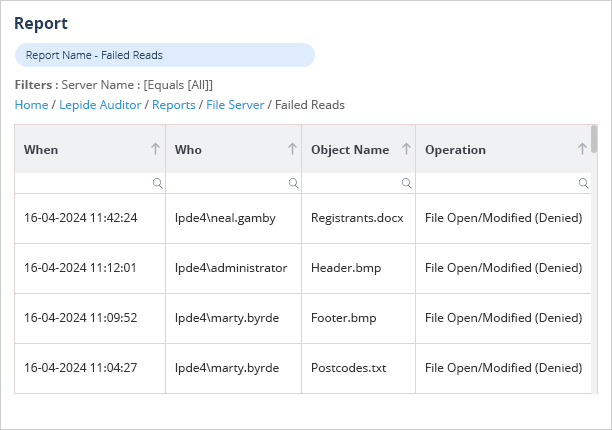
The Lepide Failed Reads Report
At Lepide, we understand the role that File Server auditing plays in keeping your sensitive, unstructured data secure. Tracking and auditing file-read events on Windows File Servers and other changes occurring to sensitive data on File Servers is a straightforward process using Lepide File Server Auditor.
The example below shows the Failed Reads Report, which is just one of the hundreds of File Server audit reports available on the Lepide Platform. The answers to critical audit questions regarding file access are displayed in a single pane of glass.

3. File and Folder Copy Events
The ability to copy files is an essential requirement for most job roles within an organization. However, when this functionality is misused and file copying activity is done for the wrong reasons, data security is compromised, and appropriate remedial action needs to be taken. To reduce this insider threat of a data breach, it is essential to monitor all file activities, especially file copy actions, to spot any malicious activity at the initial stages. However, while constant monitoring of user behavior is achievable, it can be complex and time consuming without the right solution in place.
The Lepide File Server Auditor provides a solution to this. It works in real time and allows you to view a summary of employee activity within a given timeframe to see which files have been copied.
It also provides the ability to set up real-time alerts so that immediate action can be taken. For example, if a certain number of files are copied in quick succession, this could indicate the start of a data breach. In this case, an alert would be triggered, and an immediate response implemented.
Using Native Methods
After your Windows File Server has been configured to enable auditing for the files and folders you want to monitor, you can track any change made to these folders, subfolders, and files.
To do this, open Windows Event Viewer and go to Windows Logs, Security. In the right-hand pane, use the Filter Current Log option to find the relevant events.
For example, if anyone copies a file, event ID 4656 (object access request) and Event ID 4663 (object accessed or change request – the change could be file create, file delete or file change) will both be logged.
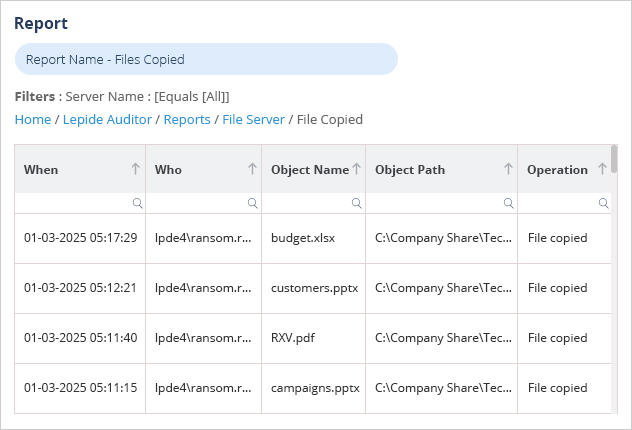
The Lepide Files Copied Report
Lepide provides a straightforward approach to monitoring files which have been copied. Unlike Native Auditing, you do not have to manually enable the auditing for different files and folders. You simply install the solution and configure the audit settings once and you are good to go.
The following example shows the Files Copied Report. You can filter the records by column including Object Name, When, Who, and any other available column.
4. File and Folder Changes/Modifications
Tracking file and folder modifications on a Windows file server is important for several reasons. Firstly, it aids in identifying unauthorized access or alterations made to sensitive data. Secondly, it assists in troubleshooting issues related to file access and permissions. Lastly, it serves as evidence in the occurrence of a security incident.
Many industries and organizations have regulatory requirements that mandate the auditing and monitoring of file access so enabling file server auditing allows you to demonstrate compliance with these regulations and provides an audit trail for potential audits or investigations.
Auditing also promotes accountability by attributing actions to specific users. When auditing is enabled, you can identify who accessed or modified a file, which is useful for tracking down responsible individuals in case of policy violations, data breaches, or accidental data loss.
Additionally, in the event of a security incident or suspicious activity, auditing provides detailed information about file access and changes. This information is valuable for conducting forensic investigations to understand the extent of the incident, identify the source, and take appropriate remedial actions.
Using Native Methods
There are various approaches to audit changes to files and folders in Windows file servers. One commonly used method involves utilizing the built-in auditing features. To implement this, it is necessary to enable auditing for the desired files and folders. Once auditing is enabled, Windows will document all access and modification events in the security event log.
However, native Windows File Server auditing is noisy, time consuming, and often lacks the critical information you need to determine what is happening to your sensitive data.
The Lepide File and Folder Changes Report
Lepide provides a simple and yet comprehensive solution to auditing file and folder changes. You can run detailed audit reports for all critical file server changes and interactions, including permissions modifications, file modifications, deletions, file copy events, and more.
The following example is of the Lepide File and Folder Changes Report:
5. File and Folder Permission Changes
Auditing changes to permissions on file servers is a critical component of any organization’s data security strategy, helping to protect sensitive data, maintain compliance, and improve accountability and transparency.
Detecting any unauthorized changes made to file permissions will help to keep sensitive data secure. By regularly auditing changes to permissions, system administrators can identify any suspicious activity and take corrective action to prevent data breaches or other security incidents.
Auditing changes to file server permissions can also help to maintain compliance with regulatory requirements, such as those governing data privacy and protection. By demonstrating that changes to permissions are being audited and appropriate access controls are in place, organizations can avoid costly fines and legal penalties.
By keeping a log of all changes made to file permissions, system administrators can track who made the changes and when which is essential for troubleshooting and investigating security incidents.
Here we will look at how to audit file server permissions firstly by using the native method of event logs and then by using the Lepide Auditor.
Using Native Methods
Follow the steps below to enable auditing and track related events in Event Viewer:
- Navigate to the required file share, right-click on it and select Properties
- Switch to the Security tab, click the Advanced button, go to the Auditing tab , click the Add button
- Select Principal: Everyone; Select Type: All; Select Applies to: This folder, subfolders and files; Select the following Advanced Permissions: Change permissions and Take ownership.
- Run gpmc.msc, edit Default Domain Policy, Computer Configuration, Policies, Windows Settings, Security Settings.
- Go to Local Policies, Audit Policy: Audit object access, select both Success and Failures
- Go to Advanced Audit Policy Configuration, Audit Policies, Object Access:
- Audit File System: select both Success and Failures
- Audit Handle Manipulation: select both Success and Failures
- Go to Event Log and define:
- Maximum security log size to 1 GB
- Retention method for security log to Overwrite events as needed
- Open Event Viewer, and search the Security Windows Logs for:
- Event sources: Microsoft Windows security auditing
- Event ID 4663
- Task Category: File System or Removable Storage
- The Account Name and Security ID will show you who changed the file’s/folder’s owner or permissions.
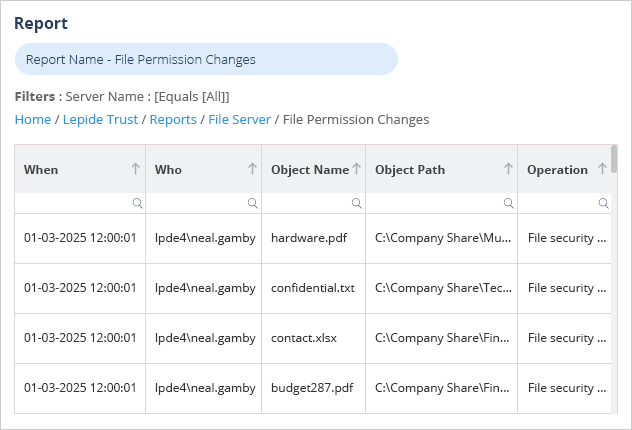
The Lepide Permission Changes Reports
The Lepide Solution gives you an easy way to detect, monitor, and report on file server permission changes by running the File Permission Changes Report and the Folder Permission Changes Report. Examples of these reports are shown below:
6. Open Shares
The misuse of user privileges is one of the main sources of data breaches within an organization and one such threat is being unaware of the files and folders that users have access to via open shares.
Open shares make it easy for end-users to have access to a given resource, however, if these open shares are not managed correctly, they can create security risks with potentially catastrophic consequences.
An open share is a resource where access is unrestricted to most end users and is achieved using Open Access Groups. These types of groups can include:
- Everyone – all users and accounts that have authenticated to the system.
- Authenticated Users – everyone except build-in, non-password protected groups.
- Anonymous Logon – a built-in group that enables users to access resources from an anonymous account.
- Domain Users – a default group within Active Directory to which users accounts are automatically added.
There are times when it is necessary to have resources that are accessible to all users on a network but it only takes one employee who has been wrongly granted write-access to a resource to result in a serious security incident.
Within the process of monitoring all network user privileges, it is essential that open shares are checked regularly as if they are not managed correctly, they can become a significant threat to network security within an organization.
However, while the constant monitoring of open shares is achievable, it can be complex and time consuming without the right solution in place.
Using Native Methods
Given the complex nature of assigning access controls to shares, it is a good idea to use automation to help to minimize the number of unnecessary open shares on your network. While it is possible to use a PowerShell script to list all open shares, there are more advanced tools available that can automatically scan for this.
Most sophisticated solutions use Machine Learning (ML) to learn the typical usage patterns of each user account and assign access controls according to the resources they access, including when, and how often they are accessed.
However, it is important not to rely solely on automation to ensure that open shares are kept under control. Automation can be very useful for identifying open shares and reporting them to the administrator, but as part of the process, the administrator must then review all open shares to prevent their misuse.
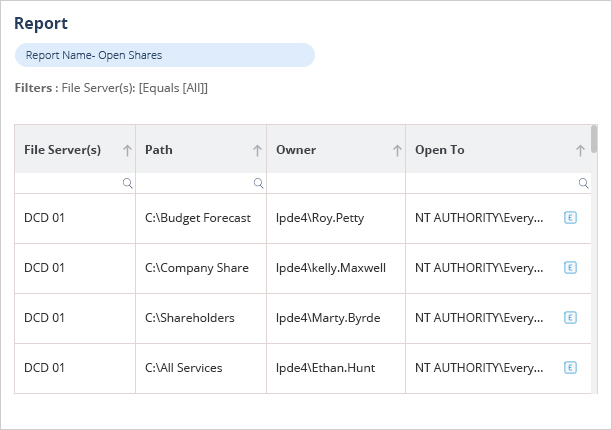
The Lepide Open Shares Report
Lepide provides a complete solution that scans and reports on all open shares within an organization.
By first running a scan and then running the Open Shares Report, it is possible to identify all open shares and then to take action to manage how they are being used. An example of the Open Shares Report is shown below:
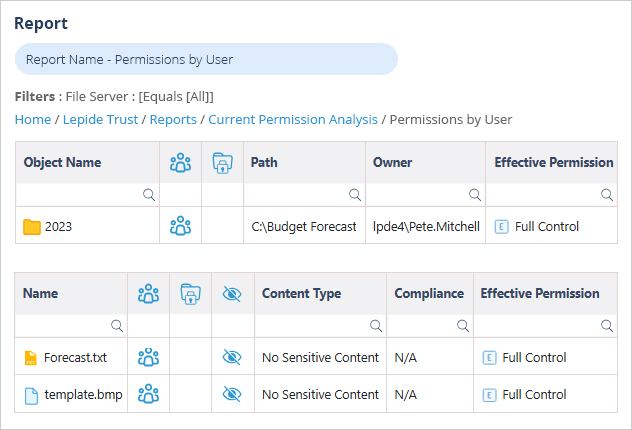
7. Permissions by Object and by User
Understanding and properly configuring file server permissions is crucial for managing access control and ensuring data security within an organization.
Best practice recommends assigning permissions through group membership rather than directly to individuals. This will ensure that sensitive information is protected, unauthorized access is prevented, and users will be able to perform their tasks without compromising data integrity.
By determining how permissions are assigned and identifying those users who have file server permissions directly applied, you can easily remove inappropriate access and thereby strengthen your IT system and data security.
Using Native Methods
Tracking user permissions can be achieved by running a PowerShell script. However, this does require a knowledge of PowerShell scripting and so a simpler process is to use the Lepide Auditor.
The Lepide Permissions Reports
A more straightforward approach, which requires no knowledge of PowerShell scripting, is to use one of the many pre-defined reports included within our NTFS permission reporting tool.
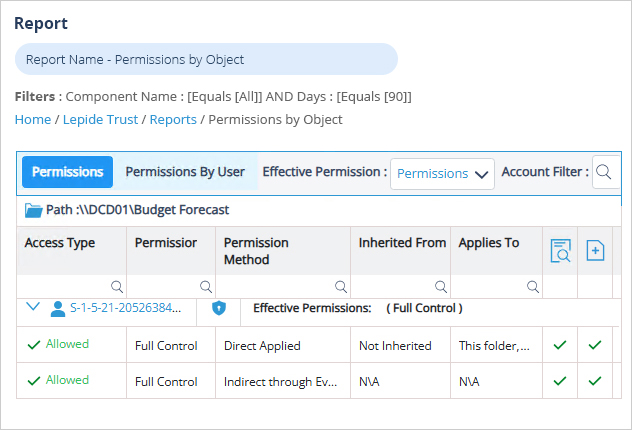
There are two reports within the Lepide solution which can be used to see permissions to sensitive data. They will both display the same data but in different ways depending on how you want to view the data. The reports are called Permissions by Object and Permissions by User.
The following is an example of the Permissions by Object Report which shows how permissions have been derived by file server objects:
The following is an example of the Permissions by User Report which shows the files that a particular user has permission to access:
8. Excessive Permissions by Object and by User
Companies often hold a wide variety of sensitive data types. This can include information such as social security numbers, credit card details, bank account information, and other account data that identifies customers or employees.
This information is necessary for employees to perform essential business functions but if there is uncontrolled access to this sensitive data it can lead to data breaches including fraud and identity theft, and to non-compliance.
When a user, either intentionally or accidentally, misuses legitimate privileges which they have been given it is known as privilege abuse. Despite these privileges being legitimately granted, users may access resources or perform actions that compromise data security.
The Principle of Least Privilege (PoLP) is an information security concept in which a user is given the minimum levels of access needed to perform their job functions. Applying this principle is a highly effective way to greatly reduce the chance of an attack within an organization.
To be able to do this, however, it is essential for an organization to have visibility over the complete list of users who have access to sensitive information. But as organizations grow, being able to see and understand who has access to sensitive data can become a complex and time-consuming task.
Using Native Methods
Excessive permissions can be listed by running a PowerShell script. This can be exported to a csv file and then further analyzed. However, this requires a knowledge of PowerShell and can be time consuming and complex. A simpler approach is to use the Lepide’s solution.
The Lepide Excessive Permissions Reports
Lepide provides a solution to this complexity with excessive permissions reports which provide visibility as to who has access and what type of sensitive data they have access to.
Once there is clarity as to exactly who requires access to do their job, it is a straightforward process to remove privileges for those who don’t need them.
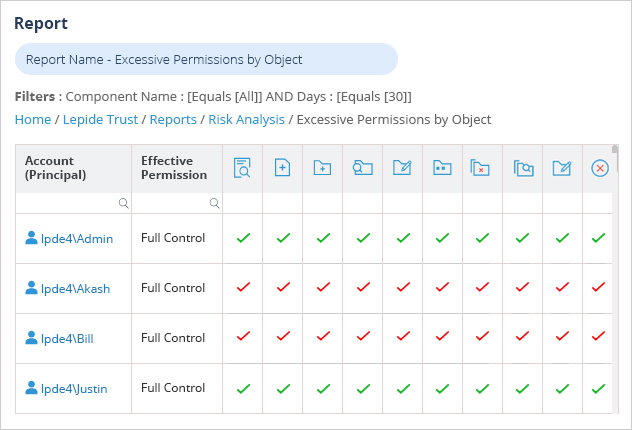
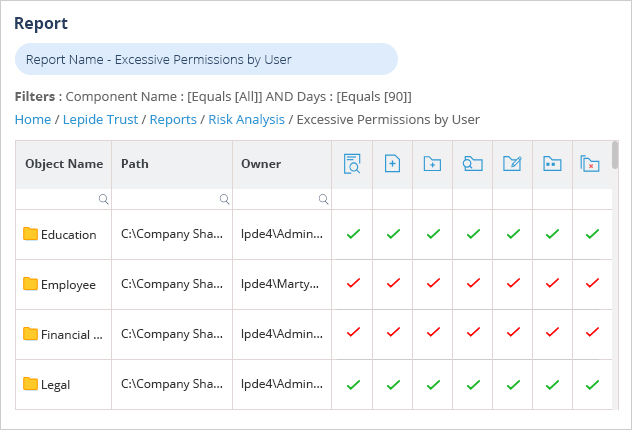
There are two reports within Lepide’s permissions analysis solution which can be used to see Excessive Permissions to sensitive data. They will both display the same data but in different ways depending on how you want to view the data. The reports are called Excessive Permissions by Object and Excessive Permissions by User.
The following is an example of the Excessive Permissions by Object Report:
Here is an example of the Excessive Permissions by User Report:
9. Stale Data
Stale data is any data collected by an organization that is no longer necessary for daily operations. In computing and database management, stale data typically occurs when data is not regularly updated to reflect the most current situation. This can occur for various reasons, such as infrequent data synchronization processes, delays in data transmission, or failure to refresh cached information.
When data becomes stale, it can lead to inaccuracies and inconsistencies in decision-making processes and increases the risk of a data breach.
It can have significant implications for business operations, customer satisfaction, regulatory compliance, and cybersecurity. For example, in industries like healthcare or finance, relying on outdated patient records or financial information can compromise the quality of care or lead to regulatory violations.
To mitigate the impact of stale data, organizations must employ strategies such as implementing automated data refresh mechanisms, enforcing data expiration policies, and conducting regular audits to identify and address outdated information. By proactively managing data freshness, organizations can ensure the accuracy, relevance, and reliability of their data assets, thereby enabling informed decision-making and maintaining operational efficiency.
Using Native Methods
Identifying stale data is the first step in the process before deciding what action to take. The following are some of the methods you can use to detect stale data:
- Evaluate timestamps: Every data entry includes a timestamp indicating when it was added or modified so analyzing these timestamps helps to determine whether data may be stale. Outdated timestamps indicate that data may be stale as it hasn’t been modified in a while. For example, documents relating to old pricing could be inadvertently used and lead to inaccurate conclusions or in a healthcare setting, outdated patient records could cause a delay or failure in providing the correct care.
- Audit data pipelines: Perform regular evaluation of your data pipeline to ensure an optimized data delivery process.
- Set up monitoring systems: Manually reviewing large datasets for stale data can be time-consuming. Implementing a monitoring system, for example our solution, automates the process, allowing you to easily identify old data. These systems can be configured to trigger alerts, instantly notifying you of anomalies in the data ingestion process.
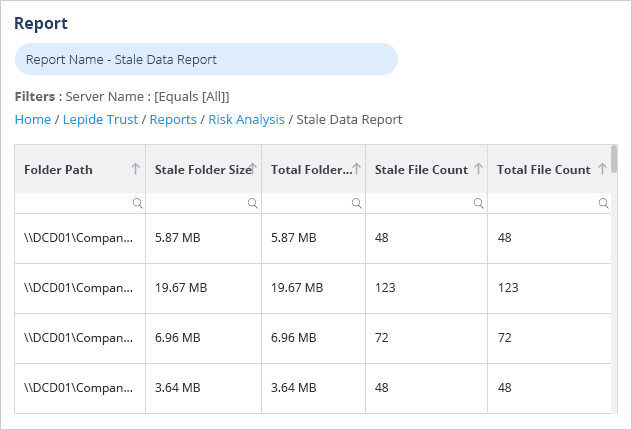
The Lepide Stale Data Report
Our software allows you to specify the number of days that you consider a document to be stale and so you can easily see any folders which contain files which are older than this specified number of days. For example in the report shown below, the number of Stale Days is set to the default value of 30 so the report will retrieve a list of folders which contain files that have had no interactions within the last 30 days.
10. Sensitive Files by Name
It is crucial to be able to locate, discover and then classify all your files containing sensitive data to add context to your security, governance and data protection initiatives.
For example, if your organization secures healthcare records, or protected health information (PHI), then you are likely to be subject to a number of compliance standards – such as the Health Insurance Portability and Accountability Act (HIPAA) in the USA. In the UK, if you store passport numbers of UK citizens then you are likely to be bound by GDPR compliance.
These types of security standards require you to be able to locate files containing sensitive data and apply the correct security and protection protocols.
Using Native Methods
The File Server Resource Manager (FSRM) is one of the native methods you can use to locate files containing sensitive data and classify them by type.
The steps to do this are:
- Create a rule to find sensitive data by doing the following-
- From Server Manager, open FSRM
- Select Classification Management – Classification Properties – Create Local Property
- Enter the property Name and decide Yes/No for the Properties Type. Click OK
- From Classification Management select Classification Rules, Create Classification Rule.
- Enter the Rule Name in the General tab.
- In the Scope tab, click on Add to add a directory. Then click OK.
- From the Classification tab can set the Classification Method to Content Classifier and set the Property.
- In Parameters, click Configure and choose Regular Expression as the Expression Type. For example, you can enter the following regular expression for UK Passport Numbers: ^[0-9]{10}GBR[0-9]{7}[U,M,F]{1}[0-9]{9}$
- Click OK and go to the Evaluation Type tab and select to enable the following:
- Re-Evaluate existing properties values
- Overwrite the existing values
- Clear Automatically Classified Properties
- Clear User Classified Properties
- Click OK
- Execute the rule you have created – this involves opening FSRM, right clicking on Classification Rules and selecting Run Classification with All Rules Now. In the Run Classification section, you can select to run the classification in the background.
- Configure a classification schedule – if you want to ensure that you are continually locating files containing sensitive data, you need to make sure the scan runs on a regular basis.
- Test and expand – this step is ensuring that you test to make sure the classification rules are working as desired and that sensitive files are being located and correctly classified.
View the reports being delivered on a schedule to ensure they are meeting your requirements.
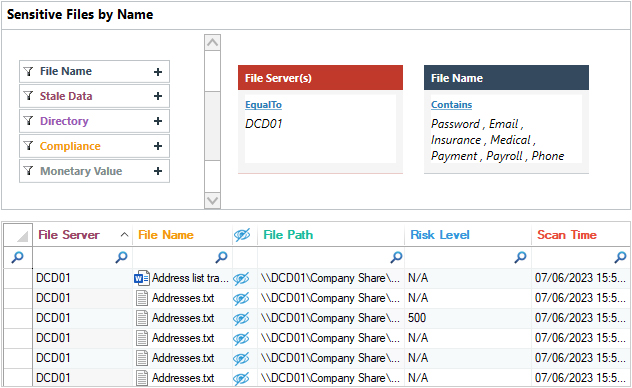
Using the Lepide Sensitive Files by Name Report
As we can see, using FSRM to locate and classify sensitive data is a very manual process that is error prone and time consuming. It’s difficult to get meaningful reports delivered and the scans can take a long time. It is also limited to data stored on Windows file servers and you can’t search for sensitive data.
A more straightforward solution is to use our data discovery and classification sowfatre which allows you to easily locate and classify sensitive data through using the inbuilt data classification engine. The Solution locates sensitive data and classifies it at the point of creation/modification in real time. Data can also be classified based on the risk and monetary value associated with it.
After configuring your data stores, classification server and selecting On the Fly Classification you are ready to run a scan. The solution contains hundreds of pre-defined patterns for locating sensitive data and also allows you to input custom ones if you require.
Once the initial scan has finished, you will have proactive, continuous data classification running.
The following example is the Lepide Sensitive Files by Name Report.

Conclusion
As we can see from the Top 10 File Server Reports, the Lepide File Server Auditor provides a far simpler alternative to the time-consuming and often complex native methods to audit Windows File Server. The Lepide Auditor for File Server, overcomes the limitations of native auditing, addresses common sysadmin challenges, including investigating deleted files, failed access attempts, and generating detailed audit reports. This, along with the ability to track and compare permissions across file servers, helps to ensure security and meet compliance regulations. If you’d like to see how Lepide Auditor can help to audit File Server changes, schedule a demo with one of our engineers or download free trial.