As an administrator, you may need to generate a list of Azure Active Directory (Azure AD) users and their related properties. This can be necessary for a security audit, a review of account configurations or for later use in a script.
As is the case with on-premise Active Directory, Azure AD users can be managed with PowerShell.
When using Microsoft 365, users are stored in the (Azure AD). They can be managed through the Azure Portal or through the Microsoft 365 Admin Center, but PowerShell is a lot quicker as it allows you to quickly retrieve and export user information.
In this guide, we will look at how to use PowerShell to get Azure AD users, together with all user properties and export them to a CSV file
NOTE: Microsoft will retire the Azure AD Graph and MSonline API on March 30, 2024. This includes the Get-AzureADUser cmdlet that has been used for a long time to get Azure users with PowerShell. These APIs are being replaced with the Microsoft Graph API.
So, for this guide, we will look at the newly supported Get-MgUser cmdlet to get Azure AD Users. This command also allows you to find specific accounts and display all or specific user properties.
Finding Azure AD Users with Microsoft Graph PowerShell Get-MgUser cmdlet
The following steps explain how to get a list of all Azure AD users by using the get-mguser command:
1. Install Microsoft Graph PowerShell SDK
The Microsoft Graph module needs to be installed to be able to use the get-mguser command. It can be installed to the current user or all users.
- To install the module for the current user run the following command:
Install-Module Microsoft.Graph -Scope CurrentUser - To install the module for all users on your computer
Install-Module Microsoft.Graph -Scope AllUsers - There may be a prompt that you are installing modules from an untrusted repository.
- Type ‘y’ to install from the untrusted repository.
- The screen will show various packages being installed. When complete, it should return to the PowerShell prompt.
- To verify that the graph module is installed run the following command.
find-module microsoft.graph - Install is complete.
In the example that follows, the module will be installed for all users:

2. Connect to Microsoft Graph using PowerShell
Before you can get Azure users using PowerShell you need to first connect with the -scope parameter and the correct permissions. Refer to the Microsoft Graph permissions reference to view all the permissions that are available.
- The following command will allow you to read the full set of Azure user profile properties:
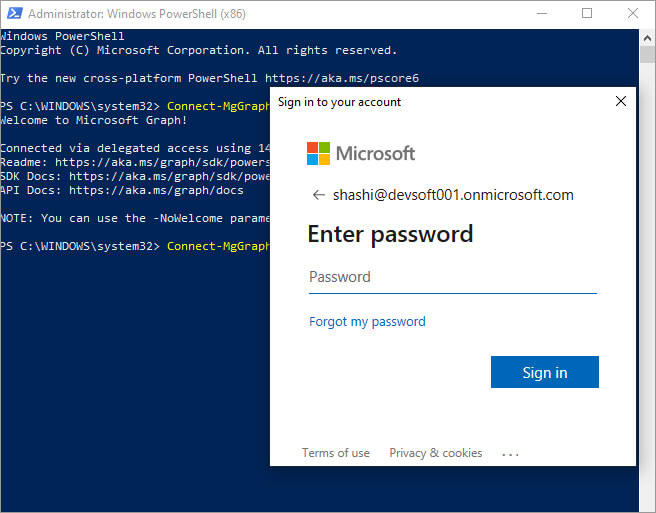
Connect-MgGraph -Scopes "User.Read.All" - When you run this command, you will be prompted to sign in.
- Sign in with your account to complete the connection to Microsoft Graph.

3. Use Get-MgUser to get and export Azure AD Users to CSV
- You should now be connected to Microsoft Graph and will be able to run the get-MgUser cmdlet.
- To get all Azure users run the following command:
get-mguser -all - This command will return the User’s Id, DisplayName, Mail, and UserPrincipalName properties.
- To get a single Azure user use the -UserID parameter.
get-mguser -UserID simon@lepidesoftware.com - To get all Azure users and export them to a csv file, run the following command:
get-mguser |select displayName,id,UserPRincipalName|export-csv "C:\temp\GetAzureAdUsers.csv"
How Lepide Helps
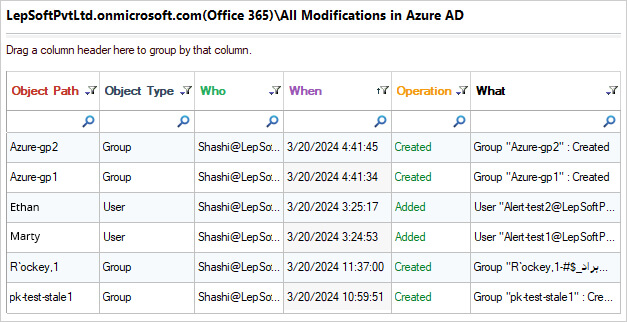
The Lepide Auditor for Azure AD provides a straightforward and comprehensive way to get information about Azure AD users. Without any knowledge of PowerShell scripting, reports can be run to provide the information you require. The example below shows the All Modifications in Azure AD Report, one of many Azure AD reports included within the Lepide Solution:

- Select Lepide Auditor, Reports, Azure AD, All Azure AD Changes
- Select a Date Range
- Click Generate Report
- The report can be filtered, saved and exported

