Managing permissions is one of the most critical security concepts to implement. It is essential that only eligible users have access to critical systems and data and so you need to ensure that their NTFS permissions include only the bare minimum that they need to do their job.
One way to generate a list of security permissions to files and shared folders on Windows servers is to get folder permissions using Microsoft PowerShell.
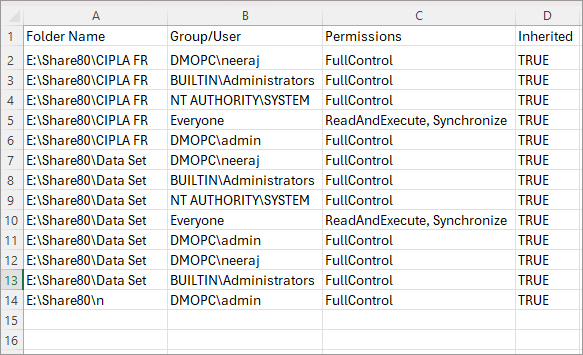
Using a PowerShell script, you can generate a PowerShell folder permissions report and export this to a CSV file which can be opened in Excel. This can be analyzed so you can identify users with unnecessary permissions and then adjust those permissions to align with your data security policy. This will then minimize the risk of a data breach.
However, the reporting of PowerShell folder permissions in this way requires a good knowledge of PowerShell scripting and the analysis can be time consuming with the amount of data produced.
In this article, we will look at how to use PowerShell to get folder permissions and then look at an alternative, more straightforward approach using the Lepide Auditor for File Server.
Get Folder Permissions and Export them to CSV Using PowerShell
- Open the Powershell ISE
- Create a new script using the code below (Note– Specify the path to the required folder and to where the result must be exported):
$FolderPath = Get-ChildItem -Directory -Path "E:\Share80" -Recurse -Force

$Output = @()

ForEach ($Folder in $FolderPath) {

$Acl = Get-Acl -Path $Folder.FullName

ForEach ($Access in $Acl.Access) {

$Properties = [ordered]@{'Folder Name'=$Folder.FullName;'Group/User'=$Access.IdentityReference;

'Permissions'=$Access.FileSystemRights;'Inherited'=$Access.IsInherited}

$Output += New-Object -TypeName PSObject -Property $Properties

}

}

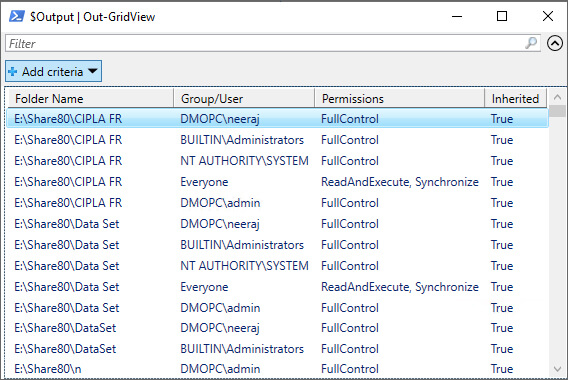
$Output | Out-GridViewRun the script
- An example of the output is as follows

- If you want to export the permissions to a CSV file, use the command below.
$FolderPath = Get-ChildItem -Directory -Path "E:\Share80" -Recurse -Force

$Output = @()

ForEach ($Folder in $FolderPath) {

$Acl = Get-Acl -Path $Folder.FullName

ForEach ($Access in $Acl.Access) {

$Properties = [ordered]@{'Folder Name'=$Folder.FullName;'Group/User'=$Access.IdentityReference;

'Permissions'=$Access.FileSystemRights;'Inherited'=$Access.IsInherited}

$Output += New-Object -TypeName PSObject -Property $Properties

}

}

$Output | Export-Csv -path "C:\mydata\FolderPermissions.csv"

How Lepide Helps
An alternative method to get and export folder permissions which requires no knowledge of PowerShell scripting is to use Lepide Auditor for File Server.
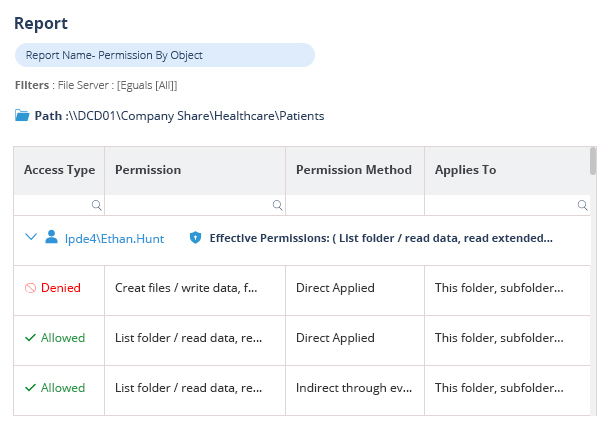
By running the Permissions by Object report from the Lepide Solution, you can see all permissions for a specific object. An example is shown below:

In this example, the selected object is Employee’s Account details. The report shows the permissions for the selected object and includes information on how the permissions are derived – Direct, Inherited or Indirect via a Group.
To run the report:
- Click the Permissions & Privileges icon
- Select Permissions by Object from the tree structure on the left
- Choose a File Server and click Generate Report
The report is generated and can be exported to CSV format. It can also be filtered and saved

