Time and again, IT administrators working on Exchange Servers struggle to find simple answers to important questions; such as who accessed and made changes to their database or who modified a specific email address policy etc. In an organization with a large number of employees working in collaboration within a network, it is not uncommon to see one or more users with authorized access to the server dismount the database, accidentally delete something or make unauthorized changes.
Thankfully, Microsoft introduced the administrator audit logging feature in Exchange to capture all modifications done by IT administrators in Exchange Servers natively.
Steps to Track Exchange Server Changes with Native Auditing
Follow the below steps to monitor modifications done by administrators in Exchange Server
Step 1 – Enable the Administrator Audit Logging.
Find the shortcut to Exchange Management Shell and open it. In the shell, type the below command in order to enable the admin audit logging feature:
Set-AdminAuditLogConfig -AdminAuditLogEnabled:$true
Step 2 – Viewing the default setting of admin audit log.
In the Exchange Management Shell, type the following command to access the default settings of Admin audit log on the screen:
Get-AdminAuditLogConfigMake sure that before running this command, you have enabled the Admin Audit Log using the above procedure. If the cmdlet: “TestCmdletLoggingEnabled” is set to false, it means Test-* will not be stored in the logs.

In case you desire to log Test-* cmdlets, then you should set the “TestCmdletLoggingEnabled” field to true as shown in the above screenshot. Note that the field: “AdminAuditLogCmdlets” is set to *, which means except Get-* and Search-* all cmdlets will be stored in the Admin Audit Log.
Also, the field: AdminAuditLogParameters is also set to * and the field AdminAuditLogExcludedCmdlets is set to none. While the former states that all parameters of cmdlets will also be logged, the latter corresponds to the fact that one can add those cmdlets here which they don’t want to see in the logs.
The field AdminAuditLogAgeLimit defines the time duration up to which the logs will be stored. By default, this value is set to 90 days.
Step 3 – Carrying out Search operation in the administrator logs.
To search something in Administrator Audit Log, type the following command:
Search-AdminAuditLog
Step 4 – Displaying Administrator logs
Once the above commands are run, the screen will automatically display the administrator logs that will track every single change made by administrator in Exchange 2016.

With the help of Administrator audit logging feature, users easily get notified about who is doing what modifications in their Exchange servers. However, for many users, it may be difficult to understand these PowerShell commands. If this is the case for you, it is recommended to deploy a third-party Exchange auditing solutions that can help track every change in the Exchange Server.
One such solution, Lepide Exchange Server Auditor, tracks and audits changes made to the Exchange Server whilst also generating alert notifications and reports.
How Lepide Exchange Auditor Helps in Auditing Changes
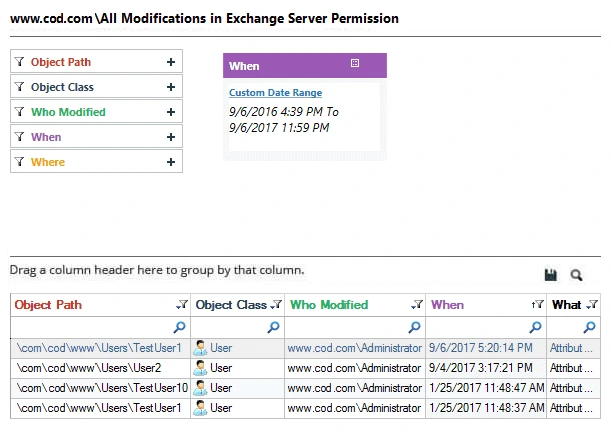
Lepide Auditor for Exchange can easily detect changes made by administrators. Below is a screenshot that illustrates the changes made by administrators.

There are numerous other pre-defined Exchange audit reports available in the software, which can be shared with other users through email or by saving on a shared location at scheduled intervals. You can also delegate which users can view these reports through a Web Console.
Our Exchange auditing solution also lets you configure alerts to be delivered via email, updates to the Radar and as push notifications to the Mobile App whenever any critical change is detected.

